
If you’ve ever looked at your photos and thought “this isn’t what it looked like in my head”, you’re not alone. Almost everyone who picks up a camera—no matter how talented they eventually become —passes through this exact moment. The frustration is real, and it has nothing to do with talent, creativity, or owning the “right” camera.
It usually comes from something much simpler.
You don’t need more tricks.
You don’t need secret settings.
You don’t need a better camera.
What you need is a map.
This guide is that map. Actually, whole Fotoforma Learning is kind of a map.
By the end of this article, you will understand how photographs are actually made, what truly matters first, and how all the pieces fit together. You’ll also know exactly where to go next—step by step—without overwhelm, without jargon, and without feeling like you’re constantly behind.
You’re in the right place.
What “Fundamentals of Photography” Really Means
When people talk about “photography fundamentals,” they often mean very different things. Some think it’s about learning buttons and menus. Others think it’s memorizing camera settings. And some believe it’s about having a natural eye that you either have—or you don’t.
In reality, photography fundamentals are not about settings at all.
They are about understanding how decisions turn into images.
The fundamentals of photography are the small number of principles that explain:
- why a photo looks bright or dark,
- why something is sharp or blurry,
- why an image feels flat or three-dimensional,
- and why some photos feel meaningful while others feel empty.
Once you understand these principles, the camera stops being mysterious. Instead of guessing, you start choosing.
Just as importantly, this guide is also about what fundamentals are not.
This article will not:
- recommend specific camera models,
- give you “magic” numbers to copy,
- assume you already know technical terms,
- or overwhelm you with theory disconnected from practice.
Everything here is explained in plain language, tied directly to what you see in your photos.
The Simple Learning Map (Read This First)
Before we go any further, here is the entire journey, simplified:
- Light – what exists in the scene before you touch the camera
- Exposure – how bright or dark the photo becomes
- Focus & Sharpness – what appears clear and why
- Composition – where the viewer’s eye goes
- Intent – what you’re trying to say with the image
Most beginners try to start at step four or five.
Most frustration comes from skipping steps one through three.
This guide follows that order on purpose.
The 7 Core Fundamentals of Photography (Big Picture Overview)
Before diving deeper, let’s zoom out. Photography can feel complicated because it contains many moving parts, but almost everything you’ll ever learn connects back to these seven fundamentals.
1. Light
Photography literally means drawing with light. Light has direction, softness, intensity, and color—and it shapes everything before the camera ever gets involved.
2. Exposure
Exposure is how bright or dark the final image becomes. It’s not just about correctness; it’s about mood, clarity, and emphasis.
3. Focus & Sharpness
Sharpness depends on focus, movement, and stability. Blurry photos are usually the result of one of these breaking down—not bad luck.
4. Composition
Composition is how you arrange elements in the frame. It determines what the viewer notices first, second, and last.
5. Color & White Balance
Color influences realism and emotion. White balance affects whether an image feels warm, cold, natural, or strange.
6. Timing & Moment
The same scene photographed a second earlier or later can feel completely different. Timing matters more than perfection.
7. Intent
Every photo answers an invisible question: why was this taken? Clear intent makes images feel purposeful instead of accidental.
You don’t master these all at once. You layer them, slowly and deliberately.
How a Camera Actually Sees the World
A camera does not understand faces, emotions, or meaning. It doesn’t know what’s important in a scene. It only does one thing extremely well: it measures light.
This is where many beginners feel betrayed by their camera. You point it at a beautiful moment, press the shutter, and the result feels lifeless. The problem isn’t that the camera is bad—it’s that it did exactly what it was designed to do.
Cameras measure average brightness.
They don’t know what you care about.
Once you understand this, photography becomes far less frustrating. Instead of expecting the camera to “get it right,” you start guiding it.
Exposure Made Simple (Without Math)
Exposure answers a single question: how bright should this photo be?
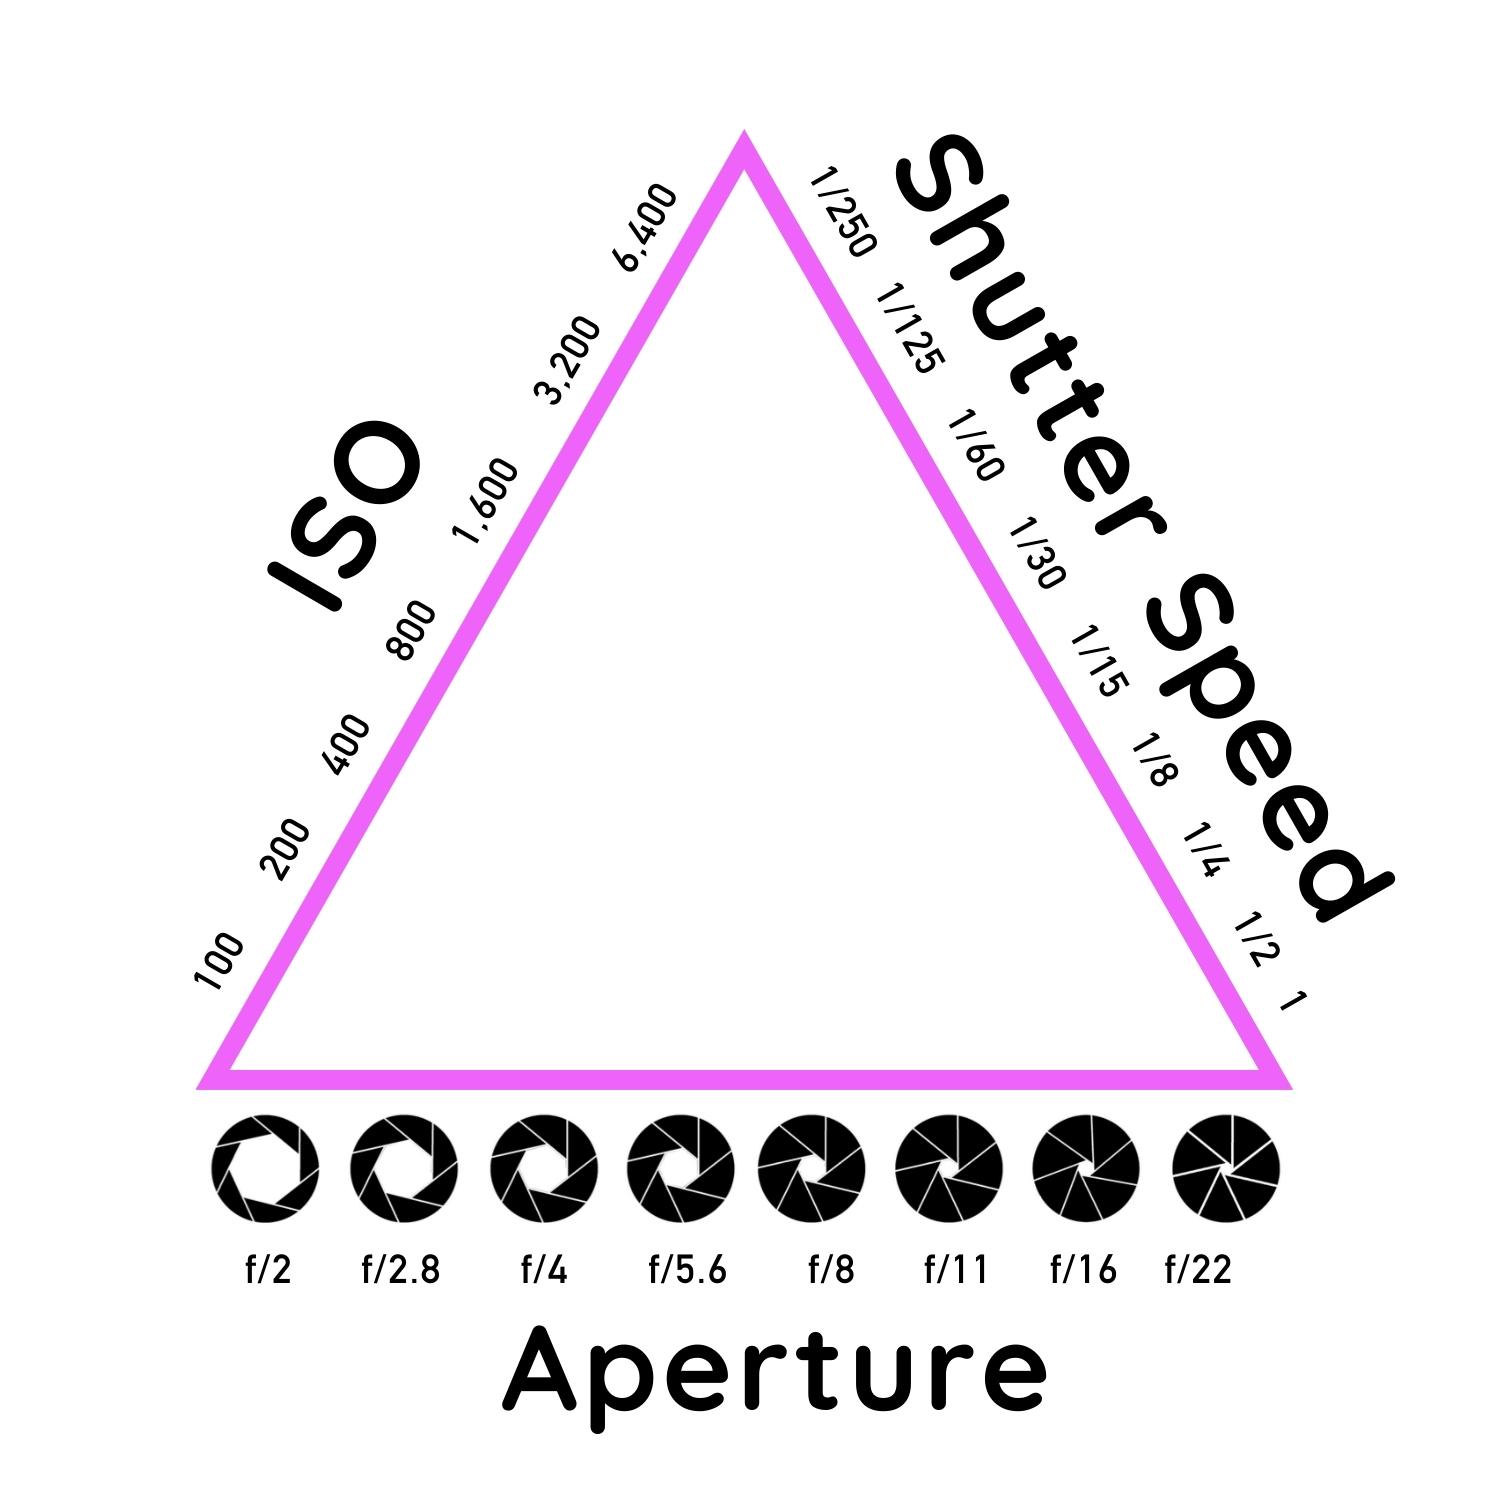
It is controlled by three things, often called the Exposure Triangle:
- Aperture – how much light enters the lens
- Shutter Speed – how long light hits the sensor
- ISO – how sensitive the image becomes to that light
Each of these affects brightness, but each also changes the look of the photo in a different way.
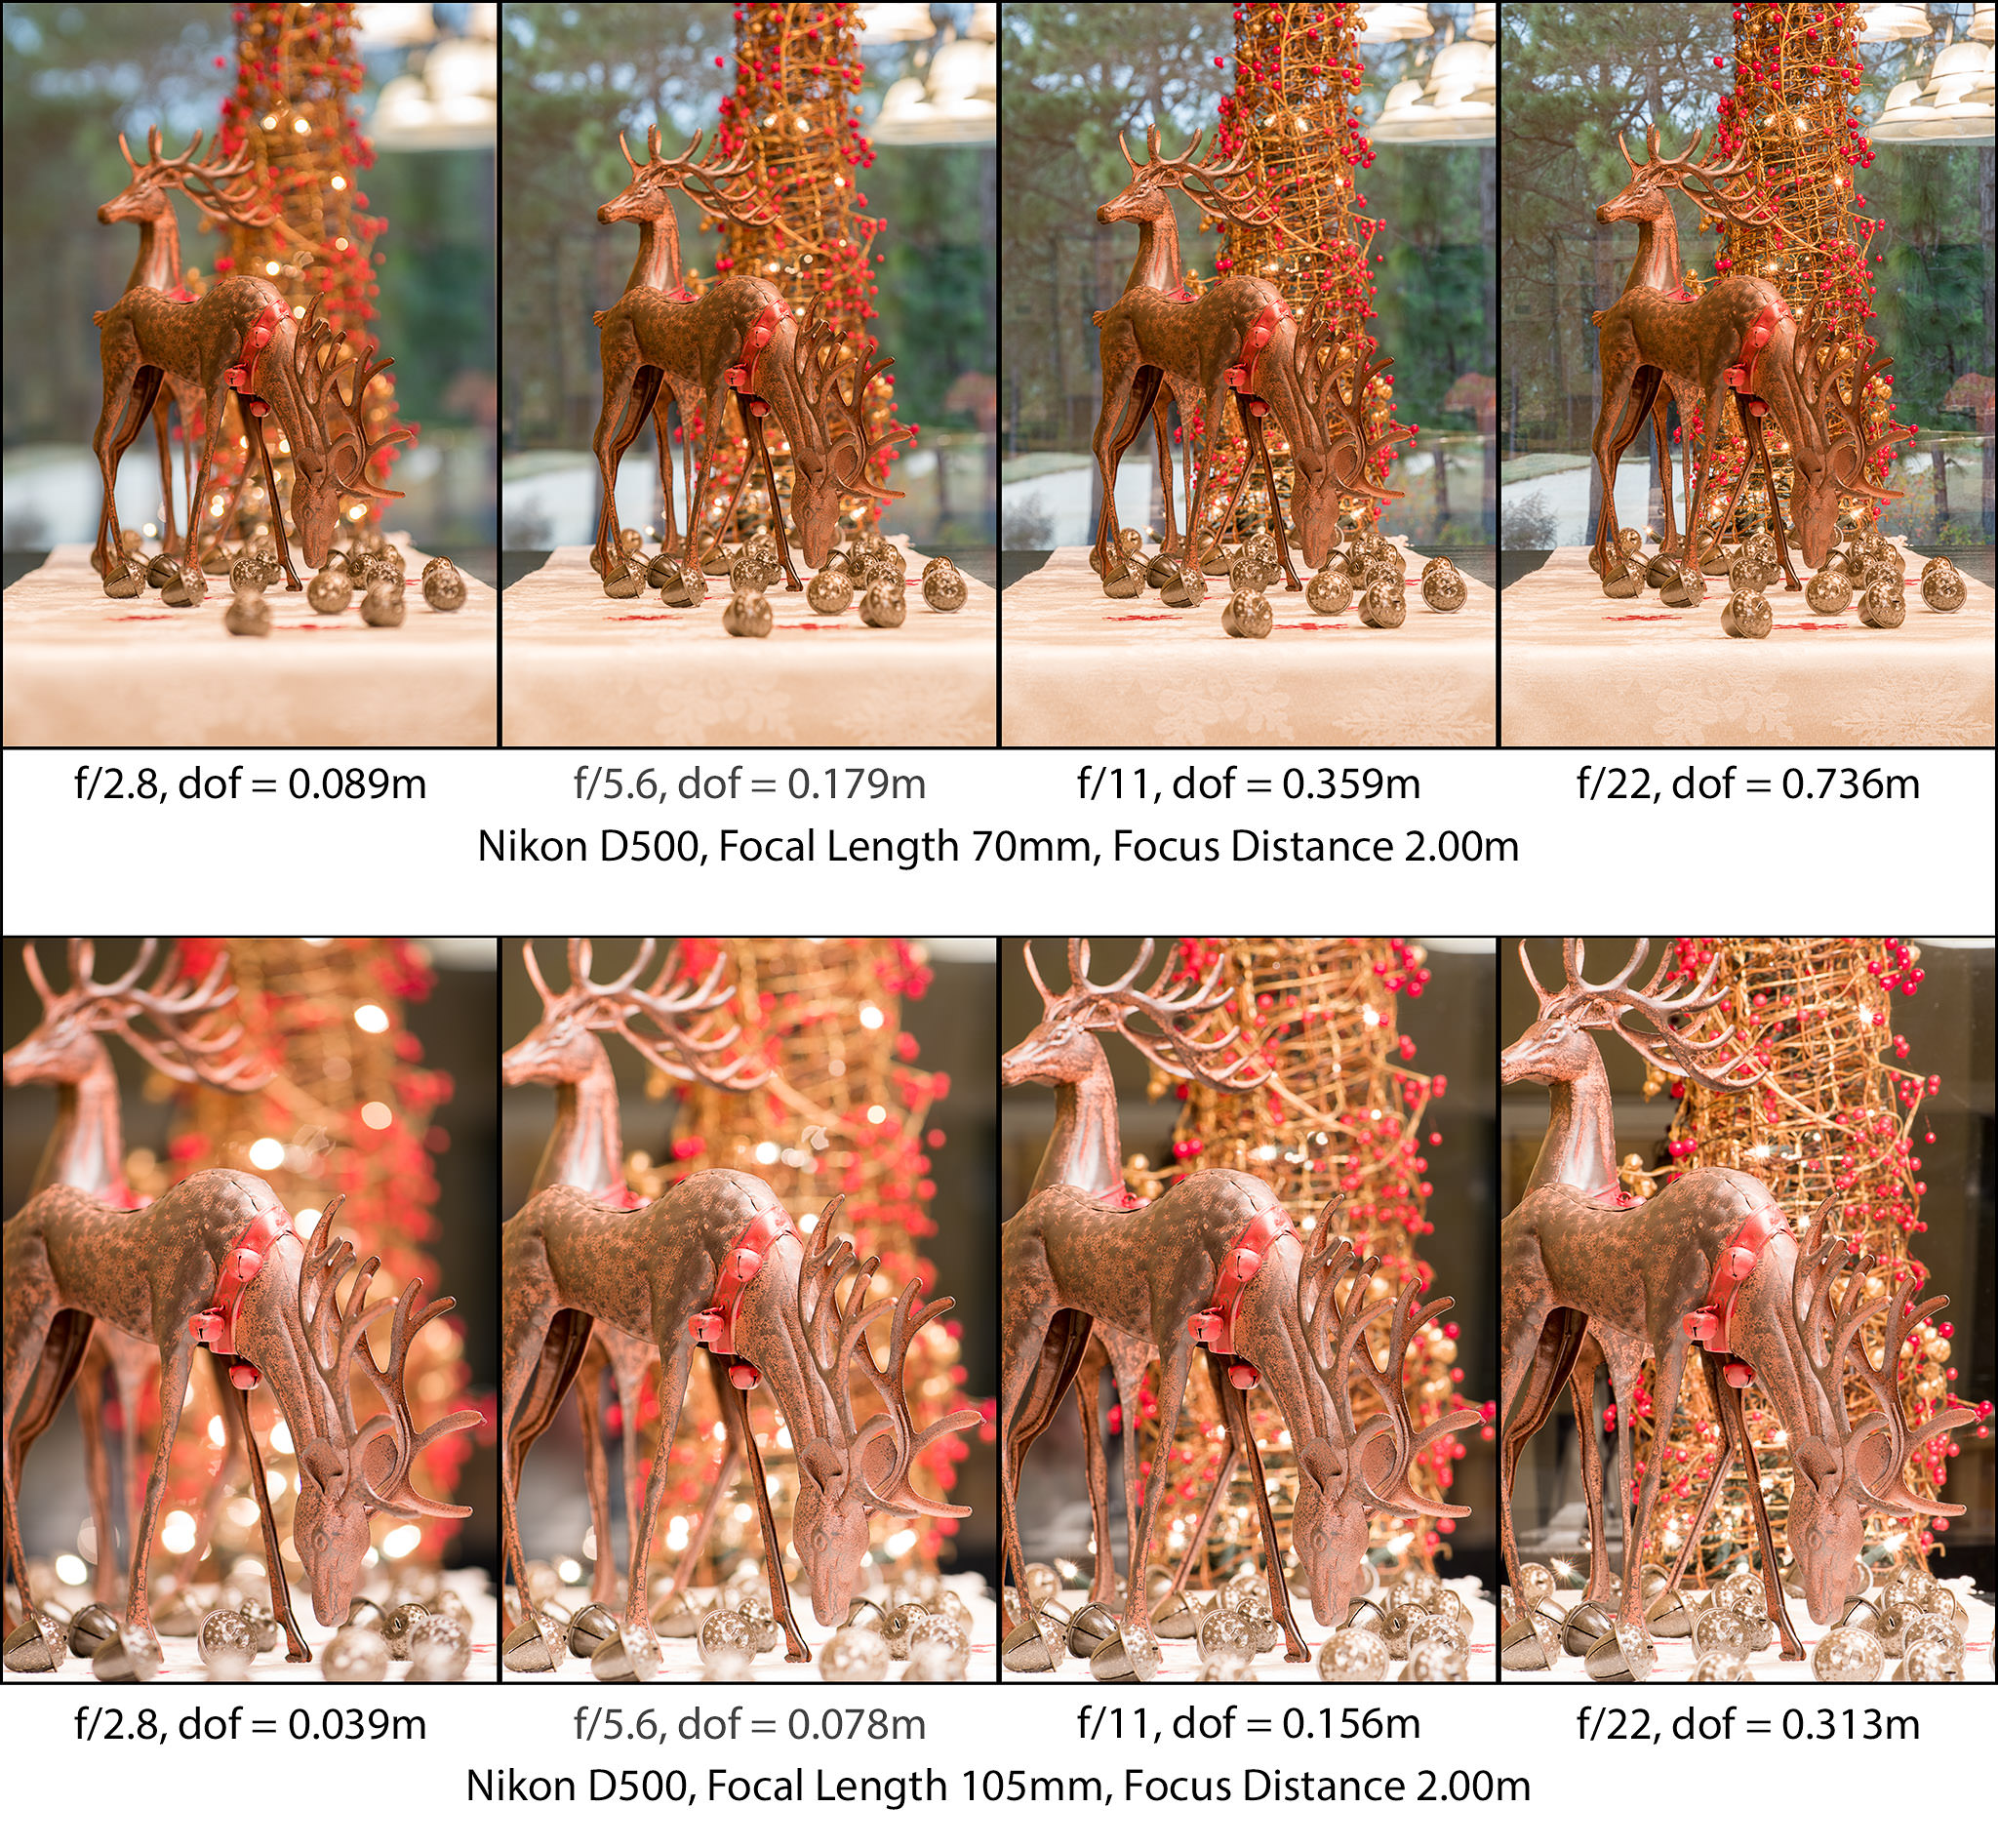
Aperture: Depth and Separation
Aperture controls how much of the scene appears in focus from front to back. A wide aperture creates background blur and subject separation. A narrow aperture keeps more of the scene sharp.
Shutter Speed: Motion and Time
Shutter speed controls whether motion is frozen or blurred. Fast speeds stop action. Slow speeds show movement and flow.
ISO: Sensitivity and Compromise
ISO brightens the image but introduces noise. It’s not the enemy—it’s a tool. A slightly noisy photo is almost always better than a blurry or unusably dark one.
The key insight is this: every exposure choice is a trade-off. There is no perfect setting, only the best compromise for your intent.
Focus and Sharpness: Why Photos Miss
When photos aren’t sharp, it’s usually because of one of three things:
- Focus missed the subject
- The camera moved during the exposure
- The subject moved during the exposure
Sharpness is not a single setting. It’s the result of coordination between focus mode, shutter speed, and stability.
Autofocus systems are powerful, but they still need direction. When you tell the camera what to focus on and how to track it, sharp photos become repeatable—not accidental.

Composition: Guiding the Viewer’s Eye
Composition isn’t about rules for the sake of rules. It’s about visual clarity.
A well-composed photo answers three silent questions:
- What is this about?
- Where should I look first?
- What should I notice next?
Basic compositional principles—like simplifying the frame, placing subjects deliberately, and creating depth—exist to help answer those questions.
Rules such as the rule of thirds are tools, not laws. Their purpose is to support communication, not restrict creativity.
Light: The Difference Between Flat and Alive
Light determines whether a photo feels dimensional or flat. Direction matters more than brightness. Side light creates texture. Front light flattens. Backlight creates separation and mood.
One of the easiest improvements beginners can make is simply moving themselves instead of changing settings. A small shift in angle can transform an image without touching the camera at all.
A Minimal Beginner Workflow (So You Don’t Drown)
At the beginning, keep your workflow simple.
For shooting:
- Focus on exposure, sharpness, and composition
- Choose RAW or JPEG consciously, not emotionally
For editing:
- Adjust exposure
- Correct white balance
- Add gentle contrast
Avoid chasing presets. Editing can enhance a good photo, but it cannot fix weak fundamentals.
A Simple Practice Plan (What to Do Next)
Learning photography doesn’t happen by reading alone. It happens by intentional practice.
A simple first week might look like this:
- Day 1–2: explore exposure in different light
- Day 3: experiment with aperture and background blur
- Day 4: practice freezing and showing motion
- Day 5: shoot indoors using ISO confidently
- Day 6: focus practice on moving and still subjects
- Day 7: a slow composition walk
From there, a structured 30-day plan or guided exercises can accelerate progress dramatically by removing guesswork.
Troubleshooting Common Beginner Frustrations
If your photos feel wrong, you’re not failing—you’re learning.
Too dark or too bright usually means exposure priorities aren’t clear yet.
Blurry images often come from motion, not bad focus.
Flat photos usually lack directional light or depth.
Strange colors often come from mixed lighting and white balance confusion.
These are normal stages, not personal shortcomings.
Your Next Steps (Choose Your Path)
If you’re brand new, start with exposure and sharpness basics.
If you understand the basics but feel stuck, follow a structured practice plan.
If your photos feel technically fine but emotionally empty, focus on composition, light, and storytelling.
If you’re deciding how to learn properly, compare self-teaching with mentored learning and clear frameworks.
Photography rewards patience and clarity far more than talent or gear.
Frequently Asked Questions
What are the fundamentals of photography?
They are the core principles—light, exposure, focus, composition, and intent—that explain why photos look the way they do.
Do I need a good camera to learn photography?
No. Fundamentals can be learned on almost any camera. Understanding matters more than equipment.
Should I use manual mode as a beginner?
Manual mode is a tool, not a requirement. Learning how exposure works matters more than how you set it.
How long does it take to learn the basics?
With focused practice, most beginners understand the fundamentals within weeks—not years.
Final Thoughts
Photography is not about mastering everything at once. It’s about building understanding layer by layer, decision by decision. When the fundamentals click, progress stops feeling random—and starts feeling earned.
You don’t need to rush.
You don’t need to compare yourself to others.
You just need a clear path forward.
And now, you have one.